So I went to the office today and was surprised to find that I was the only one there. Guess there must be some flu epidemic or something. But anyway, it gave me some peace and quiet to add a new installment of the NCRS blog. I know it's been a while, but most of the stuff I am doing is not out at the NCRS anymore. But yesterday we did something that is blog worthy. Now usually I don't really like to talk about stuff before it happens, but this is kind of cool so here you go. We are installing an area where we can evaluate different corn nitrogen programs not only for yield effects, but also for nitrate leaching potential. As mentioned previously, we are doing some tiling of our new farms 7 and 8 this fall. That is now complete, but had the idea of putting some tiles on Farm 2 where we could collect tile drainage and test for nitrates. So we laid out some plots where we could do this, and yesterday was the day. Follow along with the pictures. The first picture shows where the tile was buried. It was installed on Tuesday, but I missed it and have no pictures. But the tiles are on 30 foot spacing and run the 140 foot length of the plots, plus an additional 20 feet into the alley. We plan to collect water in, for lack of a better word, "wells" at the end of each plot. We put some concrete in the bottom of the holes and inserted the wells into the concrete. It took a good bit of labor and we had Doug, Phil, Ron and Tim on hand to help. Brian stopped by later too.
 Here we see Doug pushing the well down into the concrete base. The slats are our depth gauges.
 Tim checks to make sure that they are straight.
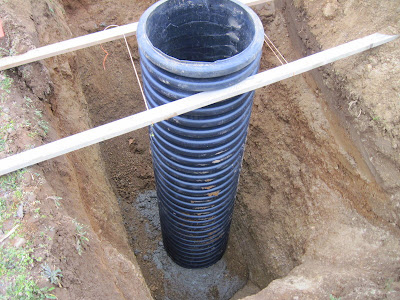
 Here is the finished tube. After the concrete cures, we will attach the drainage tile.
 Here we see the well and the end of where the plot will be. We will attach the tile to the PVC pipe and then cut a hole and insert the pipe into the well for collection of drainage water. We use PVC pipe in the alley so that no water from the alley will go into the tile. The alley is where we get the planter and sidedress rig set up, and that include running it on the ground a little for priming. So we didn't want any of that extra fertilizer getting into the wells. And we needed to have the wells out in the alley so that we can set the planter and sidedress rig down into the ground before the plot.
 The tiles are on 30 foot spacing. The plan is to have a 6 row plot (15 feet) of corn over the tile. And then we will plant 6 rows of soybeans between the corn for borders. Then we will collect drainage water as it happens and have it analyzed for nitrate. We will also be able to pump out the wells and use a hose-end meter to measure gallons so that we can determince pounds of N lost through the tiles. We will have 16 of these wells for our leaching experiment. So it is a pretty ambitious project, and we will let you know what happens.
 We plan to collect water in, for lack of a better word, "wells" at the end of each plot. We put some concrete in the bottom of the holes and inserted the wells into the concrete. It took a good bit of labor and we had Doug, Phil, Ron and Tim on hand to help. Brian stopped by later too.
 Here we see Doug pushing the well down into the concrete base. The slats are our depth gauges.
 Tim checks to make sure that they are straight.
 Here is the finished tube. After the concrete cures, we will attach the drainage tile.
 Here we see the well and the end of where the plot will be. We will attach the tile to the PVC pipe and then cut a hole and insert the pipe into the well for collection of drainage water. We use PVC pipe in the alley so that no water from the alley will go into the tile. The alley is where we get the planter and sidedress rig set up, and that include running it on the ground a little for priming. So we didn't want any of that extra fertilizer getting into the wells. And we needed to have the wells out in the alley so that we can set the planter and sidedress rig down into the ground before the plot.
 The tiles are on 30 foot spacing. The plan is to have a 6 row plot (15 feet) of corn over the tile. And then we will plant 6 rows of soybeans between the corn for borders. Then we will collect drainage water as it happens and have it analyzed for nitrate. We will also be able to pump out the wells and use a hose-end meter to measure gallons so that we can determince pounds of N lost through the tiles. We will have 16 of these wells for our leaching experiment. So it is a pretty ambitious project, and we will let you know what happens.
 Then the samples are run through this grinder for the many steps of the analysis process.
 John Paul DeBoer shows the containers of the ground up soil. A small scoop of soil is collected for the different tests. There are samples of a standard soil sample included throughout these trays for quality controls. The tests are conducted in a number of rooms throughout the building, and it looked like a bee hive as everyone was very busy in order to process the volume of samples that come through each day.
 Here is where they measure the pH of the soil. The samples are mixed with water, and continually swirled around as four pH probes are inserted for measurement. And then they lift out and are rinsed with water and the tray moves down for the next group. We were amazed that there were no spills as the "mud" swirled around to the top of the tray cup, but did not spill. I guess they have done this before. It was mentioned that they developed the robotics for this process themselves.


